For Impression and Higher
Windows 10, 8, Windows 7, Vista, 64 and 32 Bit Computer Compatibility (7.9)
- Currently, new computers being sold are pre-loaded with Windows 10 or 8, 64 or 32 Bit, operating systems. To be fully compatible with these new hardware, SEDS introduced a new upgraded version, 7.9N, to be installed with a new type of USB Security Device, bearing Serial Numbers that start with the letter ‘N’.
The new version is also backward compatible with Windows XP, Vista and 2000.
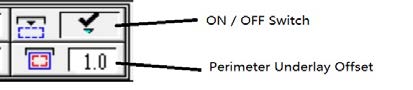
Perimeter Underlay (7.9)
- A very useful feature for fabric tack-down, marking sewing area…etc. Perimeter Underlay runs parallel to the shape of the object(s). The Offset controls the actual distance from the object in MM.
New Monogram Fonts (7.9)
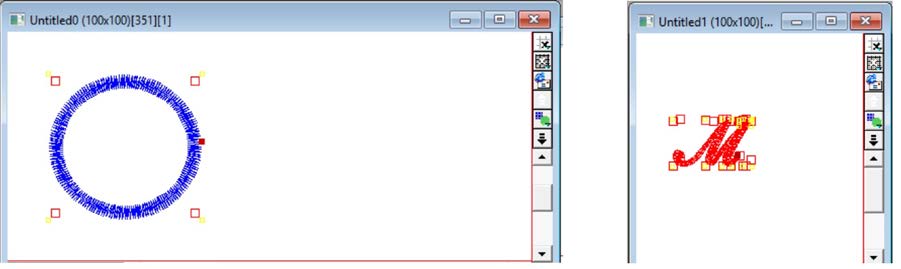
- There are 11 new font types added to the font library. They are specifically digitized for Monogramming.
These special font types are normally used in three letter groups, and all letters are in the Upper Case, with the Center Letter being larger than the two on the sides.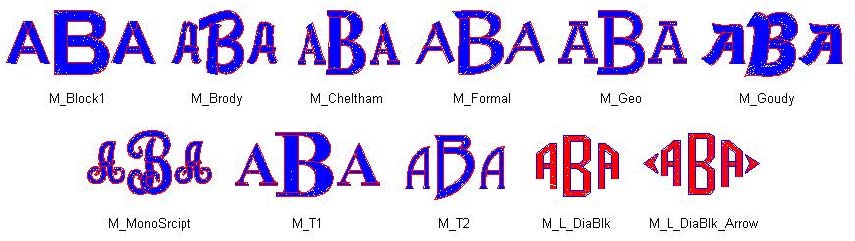
- Monogram generation (except M_L_DiaBlk and M_L_DiaBlk_Arrow):
- Go to the lettering module.
- Select one of the M font types.
- Type out the Left Side Letter using lower case letters.
- Type out the Center Letter using the Capital Letters.
- Type out and Right Side Letter, using the lower case letters.
- Continue with lettering generation.
- Monogram generation for M_L_DiaBlk and M_L_DiaBlk_Arrow:
- Go to the lettering module.
- Select M_L_DiaBlk or M_L_DiaBlk_Arrow.
- Unlike other ‘M’ fonts, the Left Side Letters and Right Side Letters are not the same. One side looks like a mirror image of the other side. Use the reference chart below to find the equivalent symbol and type out the Left Side Letter. Example: ABA=!Ba
- Type out the Center Letter using the Capital Letters.
- Type out and Right Side Letter, using the lower case letters.
- Continue with lettering generation.
- Center Letters

- Keyboard Equivalent of Left Side Letters for M_L_DiaBlk and M_L_DiaBlk_Arrow

- Right Side Letters for M_L Fonts / Right and Left Side Letters for Other M Fonts

- Monogram generation (except M_L_DiaBlk and M_L_DiaBlk_Arrow):
New In/Out Points ‘Snap to Object’ Option (7.9)
- Most of the times, a lot of digitizers prefer laying down the In/Out Points directly on the object line. The ‘Snap To Object’ feature allows users to do this quick and easy. When a point is placed within a user defined range from an object, it will ‘jump’ and stick to that object automatically.
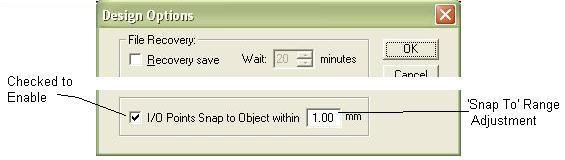
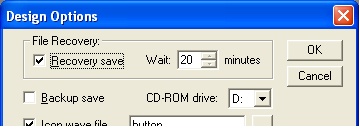
- By default, this option is enabled. It can be changed in the Design Options dialogue box.
The distance, defaulted at 1.00 mm, close enough for it to function can be adjusted in the same dialogue box.
Example: In the column below, when a start or end point is dropped at ‘Point A’, the system will automatically redirect it to ‘Point B’, which is directly on one of the objects, provided the distance from ‘Point A’ to ‘Point B’ is smaller than the ‘Snap To’ range.
- Some digitizers prefer to start the sewing in the middle of the column. In this case, it’s better to have the ‘Snap To Object’ turned off, or set the range to a smaller value.
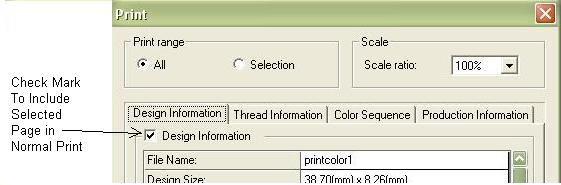
Selected Pages for Normal Print(7.9)
- The system is able to remember whichever pages are chosen for Normal Print in the Print dialogue box, for future prints of all designs.
Copy & Paste to File Center (7.9)
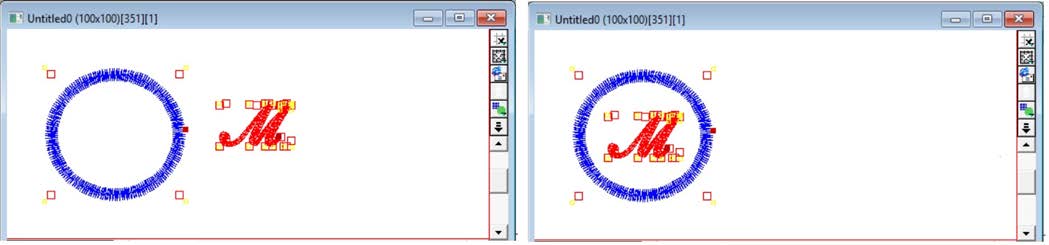
- Objective: To Copy Stitch Blocks from Source File to be Pasted to a Target File.
In earlier versions, the pasted stitch blocks are placed at the top left corner of design measured exactly the same position as when they are at the source file. Sometimes, when the Target File is smaller in size than the Source File, part of the pasted stitches disappear below the file for lack of space at the bottom left corner.
In 7.9, the pasted items come up at the File Center. This way, sufficient all around space for accommodating the added stitches can be assured.
In the Target file, only the newly pasted stitch blocks are ‘Selected’, making it easier for them to be moved to the correct position immediately. - Example: (Refer to bitmap files below.)
- Select Stitch Blocks to be copied from ‘Source File’.
- Go To ‘Edit’, ‘Copy’. (Or, use the hotkey: Ctrl-C)
- Open ‘Target File’.
- Go To ‘Edit’, ‘Paste (At the End of Sequence). (Or, use the hotkey: Ctrl-V)
- A ‘Paste’ dialogue box appears, asking whether you want to rescale the stitch blocks to Fit New Dimensions. Normally, you want the size of the stitch block to remain the same as the original.
- Click ‘No’.
- Pasted stitches appear in the ‘File Center’ of the Target.
- Newly Pasted stitches are the only items selected to be moved to another position if desired.
- Target File: Source File:
- ‘Paste’ Dialogue Box:

- Stitches Pasted to Target File: Stitches Moved to the desired position:
Launch Lettering Module Automatically After Typing (7.9)
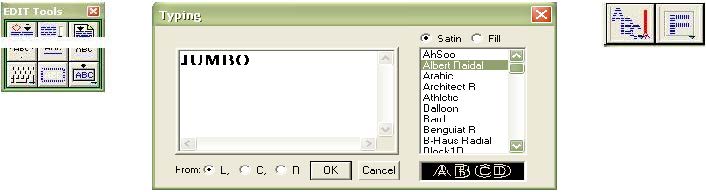
- Unlike previous versions when you have to choose the Lettering Module for the Stitch Type first, before ‘Typing’ the letters, the new version launches the Lettering Module automatically after you click ‘OK’ at the ‘Typing’ box.
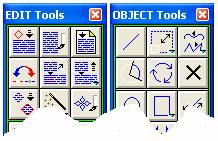
- Launch the ‘Typing’ Box by clicking the ‘keyboard’ button in the ‘Edit Tools’ box.
- Type the letters.
- Click ‘OK’
- Stitch Type automatically switches to Satin or Fill ‘Lettering’ Mode.
- Wireframes of Letters appear inside design area.
- Continue with stitch generation.
- Edit Tools: Typing Box: Lettering Mode:
New Lock Stitch Pattern (7.9)
- We have a new ‘Lock Stitch Pattern’, (-0.9,0.7,-0.5,0.3,-0.3). This pattern prevents the last stitches from unraveling as tested by seasoned embroiderers. However, the stitch pattern can be changed to fit the requirement of individual machines. The new pattern is to be installed automatically with the Dataset.
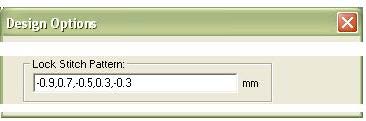
Procedure to Change the Default Lock Stitch Pattern:- Go to ‘Edit’.
- Select ‘Options’.
- In the ‘Design Options’ dialogue box, change the numbers below ‘Lock Stitch Pattern’.
- Click ‘OK’.
- Notes:
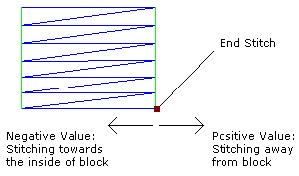
- A lock stitch pattern is a sequence of short stitches. It begins at the ending stitch of the stitch block. When the number is of a negative value, say -0.9, it means that the lock stitch goes 0.9 mm backwards towards the inside of the block. Just the opposite, when the value is of a positive value, say 0.7, the lock stitch goes 0.7 mm away from the stitch block.
- Each stitch is separated with a comma with no space in between.
- NEVER start a pattern with a positive number.
- Don’t let the numbers add up to a positive value. If it did, the last stitch will end up outside the stitch block.
- When the sum of numbers of a Lock Stitch Pattern is zero, the last stitch of the block with the lock stitches ends exactly at the End Stitch. (Not always necessary.)
- The pattern made up of a series of 3 to 6 stitches, depending on your preference. You may have to try a few patterns before finding which one suits your machine.
- The longer the sequence of stitches in the pattern, the more secure is the stitch block. However, longer sequence increases the chance of having thread breaks.
- A lock stitch pattern is a sequence of short stitches. It begins at the ending stitch of the stitch block. When the number is of a negative value, say -0.9, it means that the lock stitch goes 0.9 mm backwards towards the inside of the block. Just the opposite, when the value is of a positive value, say 0.7, the lock stitch goes 0.7 mm away from the stitch block.
- Other Suggested Lock Stitch Patterns:
- -0.9,0.7,-0.5,0.3,-0.3
- -1.2,0.9,-0.6,0.3,-0.3
- -0.5,0.5,-0.4,0.4
New Viewing Options (7.8)
- Under the ‘View’ pull-down menu, two new viewing options are added:
- Zoom to Selection
- Revert to Last View
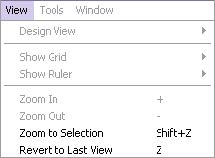
These two viewing options can be accessed much faster using the assigned corresponding hotkeys.
New Design Print-out format (7.8)
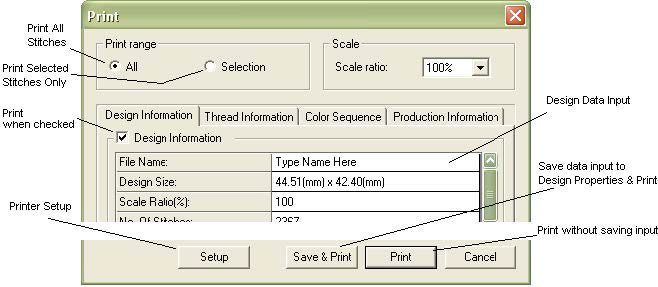
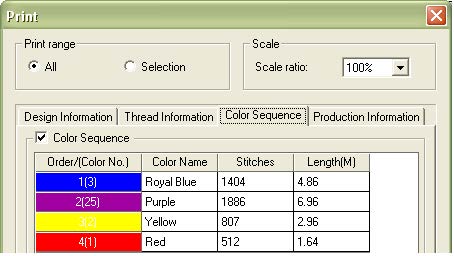
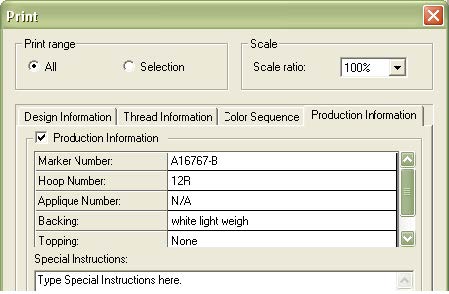
- Apart from printing out of Designs with stitch lines, the New Design Normal Print has 4 sections. Each section can be selected individually for print by checking the box next to the title of the section. The newly designed printing format provides excellent ways of storing extra useful design information. With the inclusion of the Production Information section, such printouts can be used as actual Worksheet for production.
- Design Information: General design information including Name, Size, Scale Ratio of design print….etc.
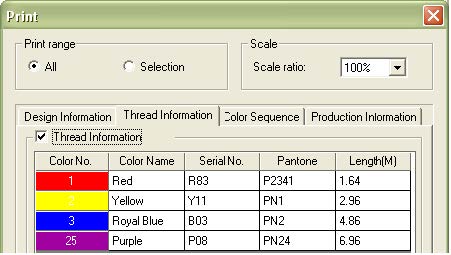
- Thread Information: Includes Color Number (the order of listing as displayed in the SEDS Color Pad), Serial Number (it can be the serial number of thread to be used or your own color reference number), Pantone (Color number in Pantone Color Chart for Thread Color reference) and Length (of thread to be used in each color).
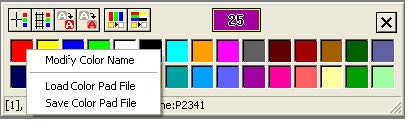
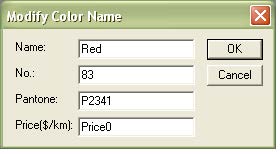
Color Name, Serial Number and Pantone number can be changed and saved ONLY within the SEDS system Color Pad by following the procedures below:- Move cursor to the color to be changed in the Color Pad
- Right Click to see pop-up menu
- Click on Modify Color Name dialog box
- Modify data in the dialog box
- Click OK
Notes: Modified items in the Color Pad will be saved for individual designs when the design file is saved.
Modified Color Pad can also be saved as a Color Pad File to be used for other designs.
- Color Sequence: The actual sewing order in a design.
- Production Information.
- Design Information: General design information including Name, Size, Scale Ratio of design print….etc.
Design Properties-New Information Tabs (7.8)
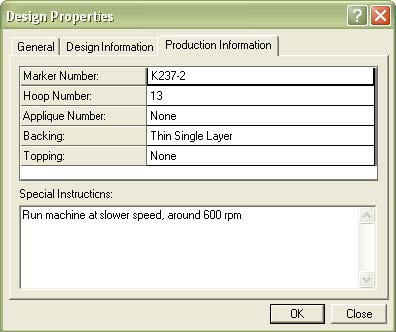
- Two New Tabs are added to the Design Properties, where general information about a design is stored.
In each of these new pages, specific Design and Production Information can be typed in and saved. These information are particularly useful to production sheet printouts.
Design Information: Production Information: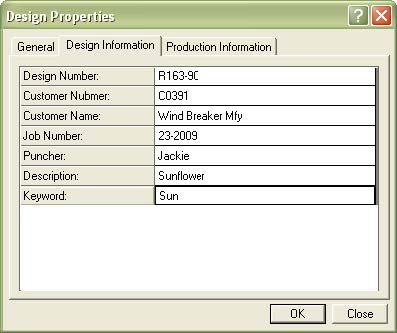
Object Tools-Design Start/End Points Modified (7.8)
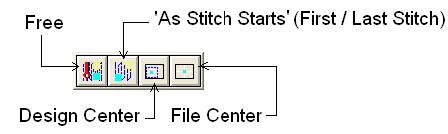
- In the ‘Object Tools’ Box, in the Start/End Points selection fly out menu, there are four choices:
- ‘Free’: User assigns the Start/End Points in a design manually.
- ‘As Stitch Starts’: Start Point is at the first stitch of a design; and the End Point is at the very last stitch.
- ‘Design Center’ (Default): For most designs, sewing starts and ends at the same point, the center of the stitching area.
- ‘File Center’: Sewing Starts and Ends at the center of the original design file.
- In the ‘Object Tools’ box: The Design Start/End commands are modified as follows:
- Start a New File, the system automatically set the start/end points at Design Center, which is the logical start/end point for MOST designs.
- Open any Existing File, the Start/End points remain as previously saved.
- User has the ability to change a design’s start/end points MANUALLY, to ‘File Center’, ‘Free’, or even to the actual starting and ending stitch points, then save the changes.
- Output any saved design to DST, or other machine file, the Start/End points shall be the same as the original design.
- User can move the Start/End points of a design temporarily without saving the changes, then immediately output to a DST, or other machine file, using ‘Save As’ in the pull-down menu under ‘File’. The resulting machine file reflects the moved start/end points. A warning message: “…..was modified, Save?” shall appear before the file is closed.
Home Embroidery File Format Support (7.8)
- Catering the fast growing Home Embroidery market, SEDS Systems has added home machine formats, such as Bernina and Janome, to the list of supported (Open and Saved As) file types.The algorithm for stitch and underlay generation in all stitch types has been revised for better stitch quality.
Home Machines Formats Supported (File Extension), or any home machines that reads these formats:- Viking Husqvarna (hus)
- Janome (sew)
- Babylock, Bernina, Brother (pec)
- Babylock, Bernina, Brother (pes)
- Pfaff (ksm)
- Pfaff (pcs)
- Pfaff (pcm)
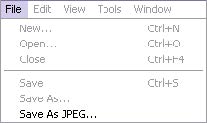
New Save Option: ‘Save As JPEG’ (7.8)
- This new File Save option can be found under the ‘File’ pull-down menu. Any design can be saved as an image (JPEG) file. The saved image file shows only stitches without objects and background image. It’s a very useful tool for sending such files to customers for pre-production approval and keeping record of digitized designs.
Object Tools-Additional Input Dialogue Box Added (7.8)
- Additional Input Dialogue boxes are added to eight functions within the Object Tools Box.
These functions are: ‘Draw Line’, ‘Scale’, ‘Draw Arc’, ‘Rotate’, ‘Draw Ellipse’, ‘Draw Rectangle’, ‘Move/Copy’ and ‘Draw Polygon’. The dialogue boxes provide additional controls to individual functions. Press the icon of any one of these functions once for normal operation. Press it AGAIN for additional operations.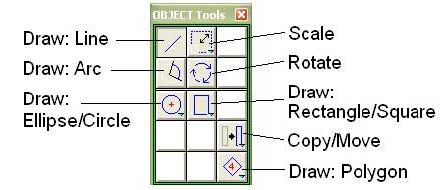
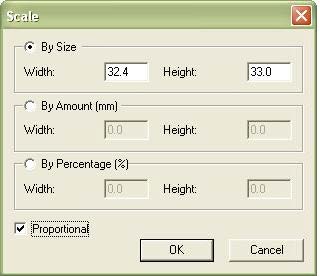
Example: Scale- Select an Object, or Stitch Block. Click on the ‘Scale’ icon twice to get the input dialogue box.
- ‘By Size’: Scale the selected to the exact width and height you defined.
- ‘By Amount’: Increase or Decrease the size of the selected by X number of mm.
- ‘By Percentage’: Scale the selected by X percent.
Enhanced Stitch Generation (7.7)
- The algorithm for stitch and underlay generation in all stitch types has been revised for better stitch quality.
SEDS Fonts : Sewing Direction and Sequence Options (Enhanced for Embroidery on Caps) (7.7)
- SEDS fonts allow user to choose the lettering sewing order within 3 options:
- Go to any one of the lettering modules.
- In the ‘Typing’ window, type in the desired letters, for example A,B,C,D,E.
- Select ‘L’, ‘C’, or ‘R’.
- Click ‘OK’.
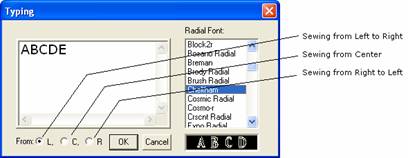
Example: Letters to be sewn are: A,B,C,D,E.- (L) From Left to Right: The conventional sewing order for lettering. Sewing Sequence: A,B,C,D,E
- (C) From Center: This is good for embroidery on caps. Sewing Sequence: C,D,B,E,A
Sewing starts from the center letter, then the letter on its right, then the letter on its left, and so on. - (R) From Right to Left: Sewing Sequence: E,D,C,B,A
- Notes: For both sewing from Center (C) and sewing from Right to Left (R), Trims shall be applied automatically in between letters.
TrueType Fonts: Sewing Direction and Sequence Options (Enhanced for Embroidery on Caps) (7.7)
- TrueType fonts allow users to choose the lettering sewing order within 4 options:
- Go to any one of the lettering modules.
- In the ‘Typing’ window, type in the desired letters, for example A,B,C,D,E.
- Select ‘L’, ‘C1’,’C2′ or ‘R’.
- Click ‘OK’.
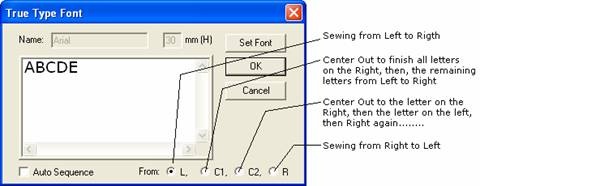
Example: Letters to be sewn are: A,B,C,D,E.- (L) From Left to Right: The conventional sewing order for lettering. Sewing Sequence: A,B,C,D,E
- (C1) From Center: This is best for embroidery on caps. Sewing Sequence: C,D,E,B,A
Sewing starts from the center letter, proceed to finish all letters on its right, then the remaining letters from left to right. This is the best way to reduce puckering. - (C2) From Center: This is also good for embroidery on caps. Sewing Sequence: C,D,B,E,A
Sewing starts from the center letter, then the letter on its right, then jumps to the letter on its left… - (R) From Right to Left: Sewing Sequence: E,D,C,B,A
- Notes: For both sewing from Center (C2) and sewing from Right to Left (R), Trims shall be applied automatically in between letters.
Multiple Undo/Redo (7.7)

The ability to go back to previous steps simply by clicking the Undo button multiple times is very useful for digitizers. If no changes are made, user can press the ‘Redo’ button to move forward.
Load Edit Tools Menu Box (7.7)
- For faster accessing the Lettering and Editing part of the program, the new version brings up both the Edit Tools and the Object Tools menu boxes together automatically, whenever a file opens up., instead of just the latter.
Automatic Design Center (7.7)
- Users no longer need to manually center a finished design before saving the file. Whenever there’s a change in stitches, the system recalculates the position of the design center (Start and End points of a design) automatically. The ability (options) to assign the Design Center, or Start/End points manually remains the same.
Group / Ungroup (7.7)
- You can now group different elements, stitches and objects alike, of a design together. Various functions, such as Select, Move, Rotate, Re-Size, Copy…etc., can be performed to all grouped members conveniently at the same time.
- To Group:
- Select all stitch blocks and objects to be grouped.
- Go to ‘Edit’ at the top left hand corner.
- Select ‘Group’ at the pull-down menu.
- To Ungroup:
- Select the group, or groups. (Multiple groups can be ungroup at the same time.)
- Go to ‘Edit’ at the top left hand corner.
- Select ‘Ungroup’ at the pull-down menu.
- To Group:
- Notes: All stitch blocks created at the same time by the Lettering module, both SEDS and TrueType fonts, are grouped together automatically by default.
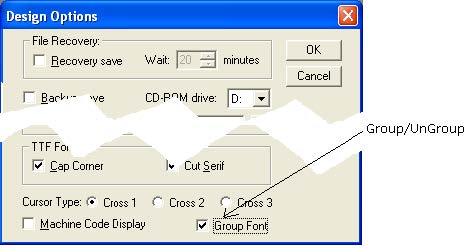
New Design Option: Group/Upgroup Fonts (7.7)
- Go to Edit, Opions……..By default, the ‘Group Font’ option is checked. If you uncheck it and click OK, all letters generated won’t be grouped.
New Hotkey for Group (Ctrl-G) (7.7)
- To Use
- Select all stitch blocks and, or, objects to be grouped.
- Hold the ‘Ctrl’ key and press ‘G’ on the keyboard.
New Hotkey for UnGroup (Ctrl-U) (7.7)
- To Use
- Select a group, or groups.
- Hold the ‘Ctrl’ key and press ‘U’ on the keyboard.
Lock Stitch and, or Trim Code Indicator for a Single Stitch Block (7.7)
- When a single stitch block is selected, any Lock Stitch and, or Trim Code will be indicated on the status bar at the bottom left corner, together with other info.

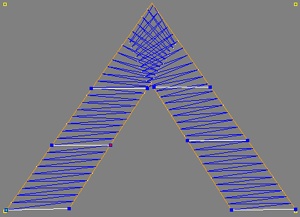
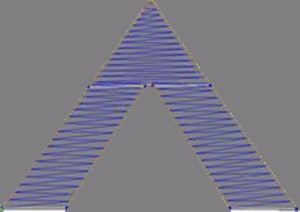
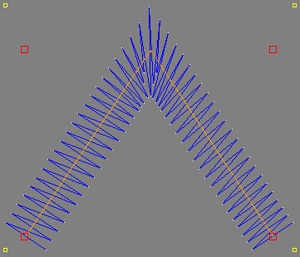
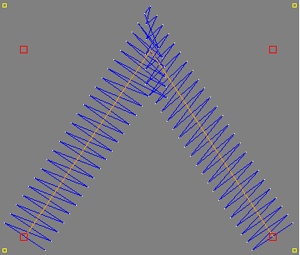
Line Stitches Auto-Repeat (7.7)
- All types of Line Stitch can be set to repeat sewing itself.
- Draw an object (line, curve, or any closed shape).
- Go to the Line Stitch Module.
- Select Line Stitch Type.
- Input ‘Repeat Number’ at the setting bar.
- Adjust other parameters if necessary.
- Insert Start and End points.
- Generate stitches.
- Notes: The actual number of lines of threads stacked together can be affected greatly by the location of Starting / Ending points and also whether it’s an ‘open’ or ‘closed’ object.
Below is a simplified chart for reference:- For a Closed Object, starts and finishes at the same point:
Repeat Number Actual Lines of Thread 0 1 1 2 2 3 3 4 - For an Open Object, starts from one end and finishes at the other:
Repeat Number Actual Lines of Thread 0 1 1 3 2 5 3 7 - For an Open Object, starts and finishes at the same end:
Repeat Number Actual Lines of Thread 0 2 1 4 2 6 3 8
- For a Closed Object, starts and finishes at the same point:
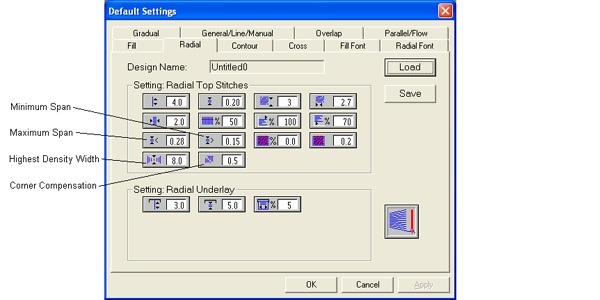
Improved Settings Manager (7.2)
- Four New Settings are introduced: Minimum Span, Maximum Span, Highest Density Width and Corner Compensation.
- The Settings Manager has been re-organized. Together with the addition of tool-tips, it makes managing settings much easier and simpler than before.
Auto-Span New Settings (7.2)
- In a satin stitch block, when the width of the column changes drastically, it may require the Span to change accordingly. Auto-Span is designed to deal with such situation.
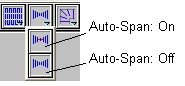
Auto-Span works in Radial Stitch, One and Two Lines, and in Lettering modules. This option is located in the upper right hand corner of the system window. ‘Off’ is its default position.
When Auto-Span is on, density of stitches is monitored by ‘Minimum Span’, ‘Maximum Span’ and ‘Highest Density Width’.
This value controls the span when column width is at its narrowest, normally 0.1 mm. That means density of stitches is the lowest.
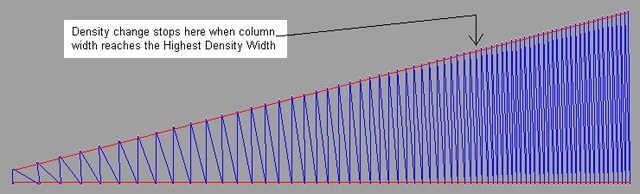
This value controls the span when column width reaches the widest value preset by ‘Highest Density Width’.
When column width is at the Highest Density Width, it will also be at its Minimum Span (Highest Density). Even when the stitch length goes beyond this value, density won’t go any higher.
- Example of Auto-Span: Density varies as column width changes.
New and Revised Settings Recipes (7.2)
- There are now eleven tested, revised or new, settings recipes in Quick Settings Selector for easy reference. Just click the pull-down menu to select what’s best for the situation.
Re-Organized Input Boxes on Settings Bars (7.2)
- Input boxes on Settings Bars of all stitch types are re-organized to be more logical and consistent.
‘True’ Character Height in Lettering (SEDS and TTF) (7.2)
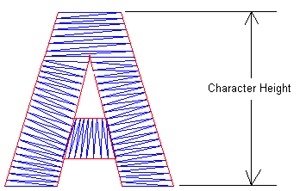
- In older versions of SEDS, character height in lettering is the total height measuring from the tip of an upper case letter to the bottom of lower case letters, such as ‘j’s and ‘g’s. In this new version, the input value reflects the height of a typical upper case letter, such as ‘A’s and ‘H’s measuring from top to bottom. This allows the user to have a much better control over lettering size.
Character Width measured as a percentage of its Original Width (7.2)
- In older versions of SEDS, character width was an independent factor. The new version changes it to be a percentage of the original character width. The default is 100%, without distortion to the character itself.
Proportional Scaling Of Lettering in ‘Display Within Box’ Wire Frame (7.2)
- This new feature is for better size manipulation of characters when they are still in the wire frame state, displayed within a box.
- Go to the lettering module, SEDS or TTF fonts.
- At the ‘Edit Tools’ box select ‘Display Within Box’.
- Type and show the characters on screen.
- Press and hold the ‘Ctrl’ key.
- Left click once on one of the Red handles at the corner of the box.
- Release the ‘Ctrl’ key.
- Move the cursor to visually monitor the Proportional size change.
- Left click again when the desired size is achieved.
- Finish the creation process.
New Design Options for TrueType Font Lettering (7.2)
- There are two new additions to the Design Options dialogue box. ‘Cap Corner’ and ‘Cut Serif’. With these options, quality and flexibility of lettering stitches generated from TrueType Font is greatly improved.
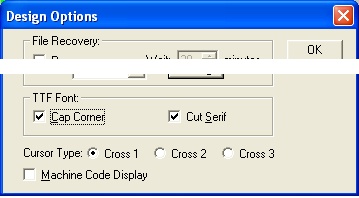
- At the menu bar, go to ‘Edit’, then, ‘Options….’.
- In the Design Options window, check the box next to ‘Cap Corner’ or ‘Cut Serif’.
- Click ‘OK’.
- Cap Corner
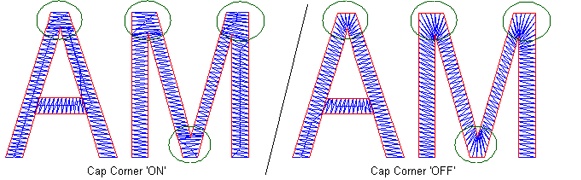
The circled areas in the above examples show clearly how the stitches cornered differently even when they are of the same font type. - Cut Serif
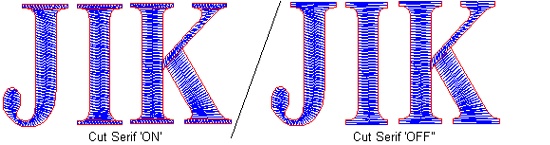
Font characters that have Serifs can be treated two ways:- ‘Cut Serif’ On: Serifs appear as independent blocks with stitches running perpendicular to the main stroke they connect to. This kind of Serifs looks more prominent and solid. It’s good for larger font size.
- ‘Cut Serif’ Off: In this case, serifs are just wider extensions of main strokes. It’s more appropriate for small lettering.
- Cap Corner
New Paste Options (7.2)
- The ‘Paste’ Options under Edit has been redefined for more practical use.
- Select the item(s) to be copied.
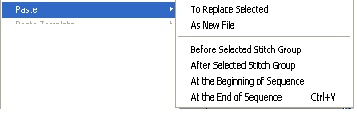
- Go to ‘Edit’ and click ‘Copy’, or, simply press the ‘Ctrl’ and ‘C’ keys at the same time.
- Go to ‘Edit’ and click ‘Paste’. A fly-out menu with 6 options appears.
- Select the option that’s suitable.
- Notes: An Object or Stitch Block must be selected before hitting ‘To Replace Selected. A Stitch Block must be selected before hitting ‘Before Selected Stitch Group’ or ‘After Selected Stitch Group’. Pressing ‘Ctrl’ and ‘V’ keys at the same time pastes the copied stitch block(s) at the end of the sewing sequence. By default, all pasted item(s) appear at the left upper corner of the design file and should be moved to the appropriate location immediately.
Open or Save DOS Base Machine Format Files (7.2)
- In previous versions, users are required to go to the ‘Punch Read’ or ‘Punch Write’ windows in order to open, or output to a diskette, a stitch file such as Tajima ‘dst’ and Happy ‘tap’…etc. Now, we can ‘Open’ or ‘Save’ such files directly through the menu bar.
- ‘Open’ a DOS Base Machine Format File
- Go to ‘File’.
- Click ‘Open’
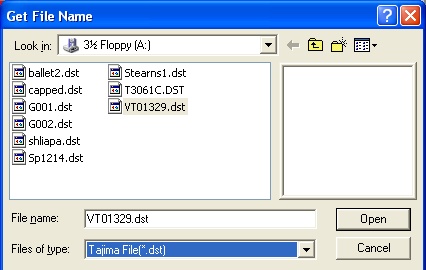
- In the ‘Get File Name’ window, locate and highlight the file wanted.
- Select and change the target file format inside the ‘Files of Type’ window if necessary.
- Click ‘Open’.
- Output to a DOS Base Machine Format File from an Active Design
- Open or create a design.
- Go to ‘File’.
- Click on ‘Save’ or ‘Save As’.
- In the ‘Get File Name’ window, set the target location for the file to be output.
- Type a name for the file in the ‘File Name’ window.
- Select and change the target file format inside the ‘Files of Type’ window if necessary.
- Click ‘Save’.
- ‘Open’ a DOS Base Machine Format File
- Notes: Unlike ‘Punch Write’, where the user can select any EDF file in any folder to convert to a machine format, the above operations only work with the active design on screen. The best advantage is that it’s no longer necessary for a new design to be saved first as an EDF file before conversion.
New Hotkey for ‘XOR’ selection during ‘Point Select’ (Alt-Click)(7.2)
- ‘XOR’ Selection means it’s a toggle between two states of selection. To use:
- Go to ‘Point Selection’.
- Press and hold the ‘Alt’ Key.
- Click the item to be selected, or de-selected.
New Hotkey for Box Selection (B) (7.2)
- User can go to ‘Box Selection’ by pressing ‘B’ on the keyboard.
(Go to ‘Point Select’ by pressing ‘T’.)
New Hotkey for De-Select All (Alt-a) (7.2)
- De-select can be done simply by pressing ‘Alt-a’ on the keyboard, Or, by selecting ‘Deselect All’ under the Edit menu.
Additional Stitch Type for Impression : One Line Walking
- One Line Walking has been added to Impression as a standard stitch type.

Recovery Save
- The Recovery Save, previously called the ‘Auto Save’, feature has been greatly improved. When it is activated, it will automatically create a temporary copy of the saved original file. If something happened that caused the system, or the computer to crash, the user will be able to recover the file at the stage when it was last recovery-saved.
- At the menu bar, go to ‘Edit’, then, ‘Options….’.
- In the Design Options window, check the box next to ‘Recovery Save’ at the top.
- Input the number of minutes between each save. 10 to 20 is recommended.
- Click OK.
- Notes: ‘Recovery Save’ DOES NOT save changes made to a design in progress. Occurrence should be more frequent than the regular manual save. Digitizers should develop the habit of saving design as it progresses manually at an interval of no more than 20 minutes.
- Whenever a recovery is required, the ‘File Recovery’ window will appear.
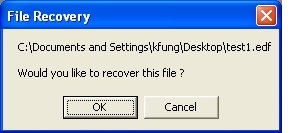
- Click OK to recover file.
- Open the recovered design and continue.
- Notes: ‘Backup Save’, (in Design Options) provides additional file protection.
When a file is saved manually, ‘Backup Save’ makes a copy of the already saved file and store it in the same folder as the original design file first, before the actual saving of the file begins. That means this backup file, with an ‘edk’ file extension will always be one version behind what is currently saved. If something went wrong with the original file and couldn’t be opened, the user can find the backup (by the same name), renames its extension to ‘edf’ and open. Backup Saved files will always remain in the folder. For saving hard disk space, it would be a good idea to delete such files when no more changes to the original designs are expected.
Quick Settings Selector
- A new pull-down menu for accessing quickly the suggested settings has been added.
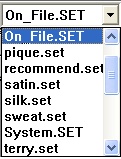
- On_File.SET:
We can now pre-set and save stitch settings for individual designs.- Open the Settings Manager. (Click on Tools, then ‘Settings Manager’.)
- Change the settings value wherever desired.
- Click ‘OK’.
- Save the design.
- Notes: The next time the same file is opened, the saved settings will be loaded and the Quick Settings Selector will display ‘On_File.SET’.
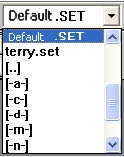
- Default.SET:
Whenever a new file is opened, the system’s preset stitch settings will be loaded as ‘Default.SET’, which, without any user intervention, serves also as the system’s recommended settings. For better flexibility, users can change any value in the default according to their own experience and habit in digitizing.- Open the Settings Manager. (Click on Tools, then ‘Settings Manager’.)
- Change the settings value wherever desired.
- Click on ‘Save’.
- In the Save As window, select ‘Default.SET’ and click ‘Save’ to replace the existing file.
- Click ‘OK’ to close the Default Settings window.
- Notes: As it affects ALL designs, be extra cautious in making changes.
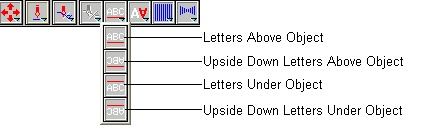
New Font Orientation Options
- Four new Re-designed Font Orientation Options, replacing the old ones, are included in the Lettering Module.
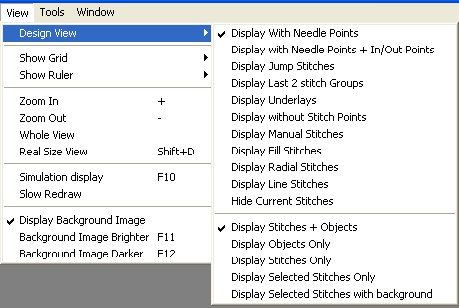
View Options
- ‘View’ has been added to the menu bar, allowing a lot more viewing options to be accessed easily.
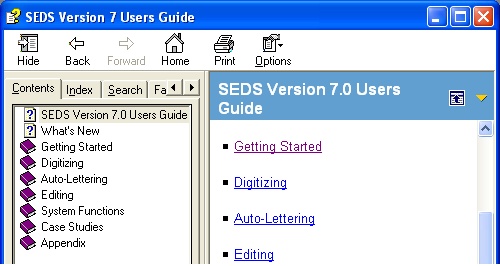
Online Help User’s Guide
- The addition of the Online User’s Guide provides a quick and easy reference on using the program. It can be opened by simply clicking on the F1 key on the keyboard, or, on the Help button on the menu bar.
New Hotkey for Stitch Block Navigation (Shift+Arrow key)
- To use
- Select one stitch block.
- Press and hold the ‘Shift’ key, then, hit one of the Arrow Keys to go to the next or the previous stitch block in the stitching sequence.
New Hotkey for Zoom In / Out (+/-)
- Zooming has never been simpler. Just press the ‘+’ or the ‘-‘ key.
New Hotkey for Panning (Alt+Arrow Key)
- To use
- Zoom in to an area in the design.
- Press and hold the ‘Alt’ Key, then, press one of the Arrow Keys to view different areas of the design.
For Imagine and Higher
New Line Stitch Type: Chain Stitch (7.8)
- The added new Chain Stitch is for Single Line stitching. The stitches look like a series of chain links. This stitch type is useful for making thin borders and very thin manual letters.
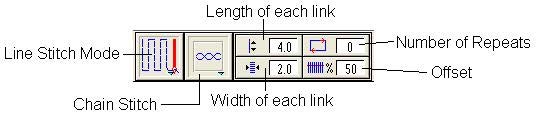
The stitch type offers 4 control settings:- Length of Each Link
- Width of Each Link
- Number of Repeats (Repeat Runs)
- Offset (Percentage of the width of a link on one side of the object.)
- Examples:
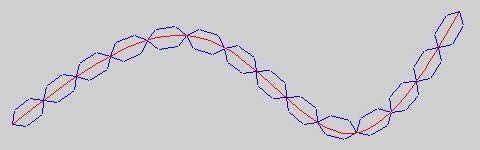
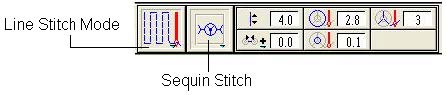
New Line Stitch Type: Sequin Stitch (7.8)
- This feature is to be used solely for embroidery machines with Sequin Attachments.
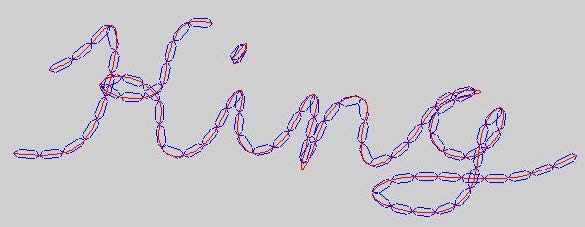
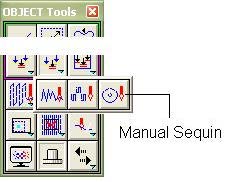
New Manual Stitch Type: Manual Sequin Stitch (7.8)
- The icon for Manual Sequin can be found in the Object Tools Box. Its function is for laying down sequin disks manually without an object, and is to be used solely for embroidery machines with Sequin Attachments.
New Cornering Options for Radial (Satin) Stitches (7.0, 7.2)
- Four options are devised, giving users more choices in dealing with cornering in radial stitches.
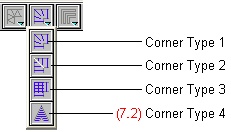
- Two Line Radial
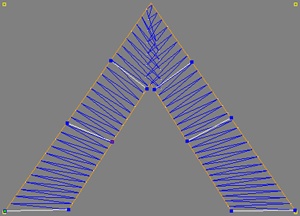
Corner Type 1: This is most commonly used type of cornering.

The guide lines are applied the usual way.Corner Type 2 (A):
Corner Type 2 (B):
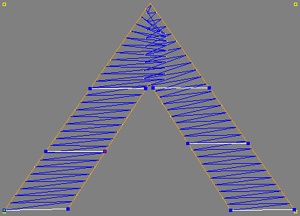
Stitching is from left to right. (A) and (B) show different ways of applying guide lines to achieve different effects.
For this corner type ONLY, the amount of overlap from the side that sews first is controlled by the 'Corner Compensation' setting, which is in mm.
 Corner Compensation
Corner Type 3 (A):
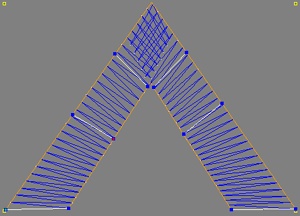
Corner Type 3 (B):
In this corner type, overlapping occurs fully on both sides, creating a more solid corner. (A) and (B) show different ways of applying guide lines to achieve different effects. Corner Type 4:
In this type, the system automatically put a ‘capped’ block connecting the stitches going into the corner and the stitches coming out of the corner. It’s better to have ‘Auto-Span’ turned on to accommodate the stitch length variation. - One Line Radial
For One Line Radial, there's no guide line to apply. Corner Type 1:
Corner Type 2:
For this type, the amount of overlap can be controlled by the 'Corner Compensation' setting.Corner Type 3:
Corner Type 4: (7.2)
In Type 4, the system automatically put a 'capped' block connecting the stitches going into the corner and the stitches coming out of the corner. It's better to have 'Auto-Span' turned on to accommodate the stitch length variation.
- Two Line Radial
Change Size of Stitch Groups Proportionally (7.2)
- In older versions, users have to make manual calculations to change the size of stitch group(s) proportionally. Version certainly makes things easier by providing the ‘Proportional Re-Size’ Options.

- By Number
- Select the stitch blocks to be changed.
- Go to the ‘Edit Tools’ box and select Change Number/Size of Stitches.
- At the upper right hand corner, right click on ‘Change Number of Stitches’ and pick ‘Change Size of Stitch Groups’ from the pull-down options.
- Turn on the ‘Proportional Re-Size: On’ option.
- Input the width, OR, the height desired by actual measurement or by percentage.
- Right click on the design window to make the size change.
- By Moving Cursor: (Ctrl-Click)
- Select the stitch blocks to be changed.
- Go to the ‘Edit Tools’ box and select Chang Number/Size of Stitches.
- At the upper right hand corner, right click on ‘Change Number of Stitches’ and pick ‘Change Size of Stitch Groups’ from the pull-down options.
- (When ‘Proportional Re-Size’ is ON.) Click inside the design window close to the selected items and move the cursor to visually monitor the real-time change in wire frame mode. Click again to confirm when the desired size is achieved.
- (When ‘Proportional Re-Size’ is OFF.) Hold the ‘Ctrl’ key and Click inside the design window close to the selected items and move the cursor to visually monitor the real-time change in wire frame mode. Click again to confirm when the desired size is achieved.
- Notes: The ‘Ctrl’ key in this case acts as a toggle switch to countermand the On/OFF states of ‘Proportional Re-Size’.
- By Number
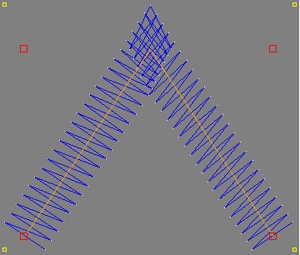
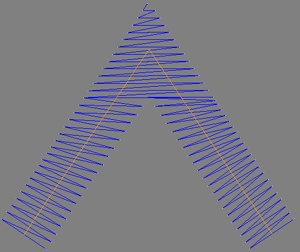
Image Processing
- Imported or scanned in images can be Rotated, and Mirrored Horizontally or Vertically.
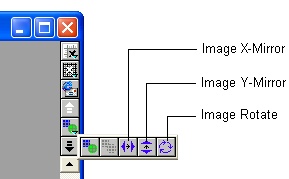
Image Processing features can be found at the upper right hand corner of the design window. Right click at the ‘Image On’ icon to reveal the fly-out menu.
The ‘Image X-Mirror’ and ‘Image Y-Mirror’ are for flipping the image horizontally and vertically, respectively.
Image Rotation: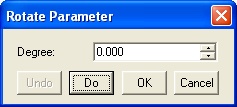
- Click on the ‘Rotate Image’ button and the ‘Rotate Parameter’ dialogue box comes out.
- Input the degree of rotation. A positive number means a clockwise rotation and a negative value makes the rotation turns counter-clockwise.
- Click ‘Do
Change Underlay Type for Multiple Stitch Blocks
- It is now possible to change the underlay type of multiple stitch blocks of the same primary stitch type, at ‘Change Stitch Settings’.
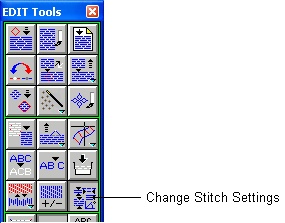
- Select all the stitch blocks to be changed. (Must be of the same stitch type.)
- Click on the ‘Change Stitch Settings’ button.
- At the Settings bar, right click on the ‘Underlay Pattern’ window to reveal all the available underlay types.
- Select the type desired.
- Right click in the design window to finalize the change.
Additional Stitch Type for Imagine: Turn Radial Fill
- Turn Radial Fill is now a standard stitch type for SEDS Imagine.
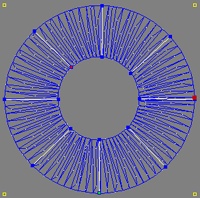
Creating a donut shape fill stitch:- Draw two circles, one inside the other and have them remain selected.
- Select the Two Line Radial Stitch mode.
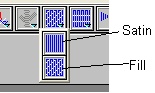
- At the top right hand corner of the system window, right click on ‘Satin’ to reveal the ‘Fill’ option.
- Click on ‘Fill’.
- Go back to the design window and go to the punching mode.
- Adjust the settings.
- Apply the guide lines as shown in the sample above.
- Right click and put down the Start and End points.
- Right click to generate stitches.
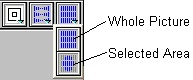
New Contour Stitch Options
- Digitize Selected Area
Users can now choose between ‘Contour Stitching’ a whole picture or just a part of it (leave out the background). Not only it is good for lessen the stitch count; this improvement invites the creative mind in applying different artistic elements to the background of pictures.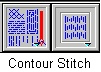
The process is quite simple:- Import or scan in a good quality picture.
- Go to ‘Contour Stitch’ mode.
- Choose the ‘Selected Area’ option at the upper right hand corner of system window.
- Adjust parameters.
- Outline the area in the picture to be stitched with a closed object.
- Go to punching.
- Contour Stitch running at 45° and 135° (7.2)
Apart from the original Vertical and Horizontal sewing angle options in Contour Stitch, two more new choices are added.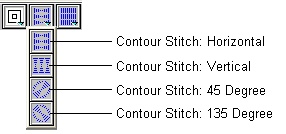
For Insignia Level Only
New Fill Pattern Displacement Options for Pattern Fill (7.7)
- Two new stacking options are added to the original fill pattern.
Example: As shown below, by selecting different displacement options, the original Brick Patten can be transformed to have very different looks.
New Fill Pattern Displacement Options for Satin Stitch Pattern Fill (7.7)
- Two new stacking options are added to the original fill pattern applied in Satin Stitch.
Example: As shown below, by selecting different displacement options, the original Brick Patten can be transformed to have very differently looks.
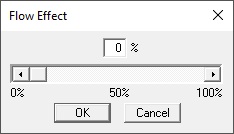
New Feature: Flow Effect (7.2)
- When ‘Flow Effect’ is applied, the uniformly regular appearance of a stitch block is transformed into a livelier artistic ‘Flow’ look. The users can be very creative with this new feature.

- Create a stitch block.
- Draw an open object to control the ‘Flow’.
- Make sure that only the intended Stitch Block (without its object) and the flow control object are selected.
- In the Edit Tools box, Right Click over the top of the ‘Move a Stitch Point’ icon and Select ‘Flow Effect’.
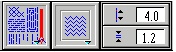
- When the ‘Flow Effect’ Window comes out, slide the percentage bar until it attains the desired effect.
- Below are two examples of ‘Flow Effect’.
A1 and A2 are the original stitch blocks and B1 and B2 are the transformed.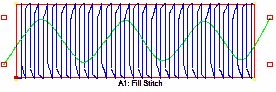
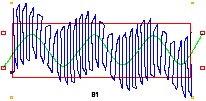
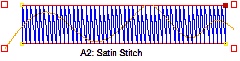

Notes: Even the ‘Control Object’ has to be an opened one; the stitch block to be transformed can be very flexible. In fact, it can be of any type and shape or even multiple connecting stitch blocks.
New Stitch Type for Insignia: Flow Stitch
- Flow Stitch is the latest addition of stitch type to Insignia’s arsenal. It’s very useful for digitizers with an artistic mind.
Flow Stitch is listed under ‘Special Stitch Types’. It requires 2 objects, one closed and one open. The closed one is the stitch blocks actual shape. The open one directs the ‘flow’ of the stitches.
Below are two examples of Flow Stitch: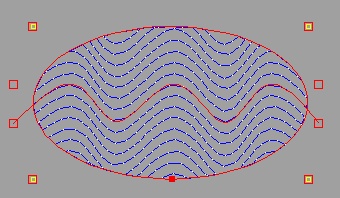
(Flow1)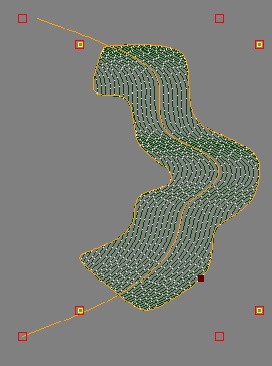
(Flow2)- Go to the Flow Stitch mode.
- Draw a closed object.
- Draw an open object (controller) to steer the stitch flow direction. (The controller has to be drawn over and beyond the limit of the closed object.) Stitches created will be running parallel to the controller.
- Select both objects.
- Adjust the parameters.
- Right click and put down the Start and End points.
- Right click to generate stitches.
- Notes: In case some of the stitches aren’t flowing correctly, adjust the position and length of the controller with ‘Move Points’ and right click to re-generate stitches.
To achieve a good ‘flow’ visual effect, density must be set so low that individual parallel lines of stitches can be seen clearly.
New Feature in 3D Globe
- Concave 3D warp (Reverse Warp) is added to the original 3D Globe.
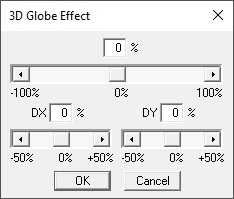
Slide the top bar in the 3D Globe Effect dialogue box to the left creates the concave effect.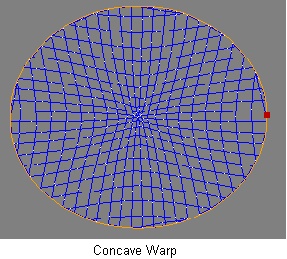
Notes:- The DX and DY factors in the 3D Globe Effect dialogue box, are for moving the center of the warp horizontally and vertically.
- Theoretically, there is no restriction to the shape and stitch type to do 3D. Warping occurs inside the stitch block and the shape of warp is circular and elliptical.
- A shape can be warped many times to achieve different effect. In the example below, the stitch block was warped first normally, (top bar slides to the right), then warped again reversely (top bar slid to the left) with the center moved.
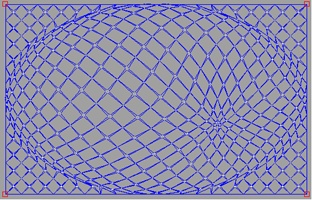
Enhanced 3D Globe
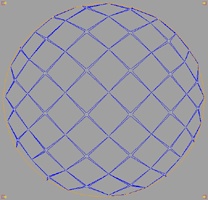
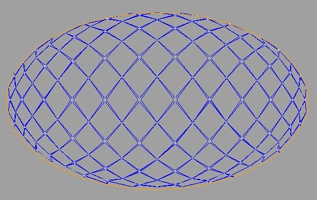
- Elliptical shape warp is added to the original ‘3D Globe’ feature.
Applying the 3D Globe Effect feature is really easy.- Create a circular or elliptical stitch block.
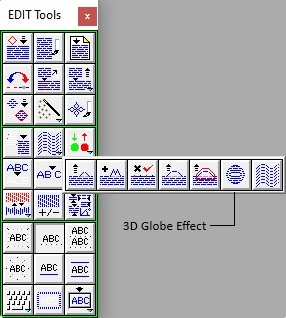
- Pick the ‘3D Globe Effect’ in the Edit Tools box.
- The 3D Globe Effect dialogue box will come out.
- Slide the top bar towards the right slowly to watch the instant change.
- Click OK.
- Below are two examples:
Enhanced Stitch Sculpturing
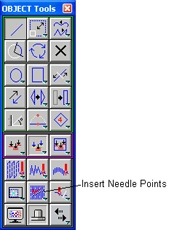
- With the inclusion of the ability to remove neighboring stitch points in the ‘Insert Needle Points feature, sculpturing on a filled block becomes more outstanding.
- Make a fill.
- Create objects inside fill.
- Make sure the new objects and the fill are selected.
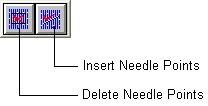
- Go to the Object Tools box and select ‘Insert Needle Points’.
- Click ‘Insert Needle Points’.
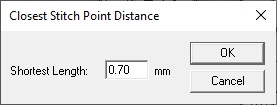
- A ‘Closest Stitch Point Distance’ dialogue box comes up.
- Input the desired number and click OK to finish.
- Below is an example of Stitch Sculpturing using ‘Insert Needle Points’.
Original: Simulation: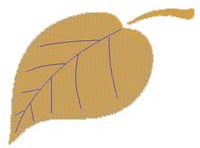
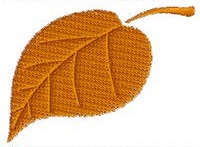
The blue lines in the Original are the objects imitating the veins on the leaf.
New Hotkey for Moving Selected Stitch Block (Ctrl+Arrow Key)
- To use
- Select a stitch block.
- Press and hold the ‘Ctrl’ key and press one of the arrow keys to move selected item(s).
*All functions and features described in the above document are subject to changes without prior notification by the manufacturer.